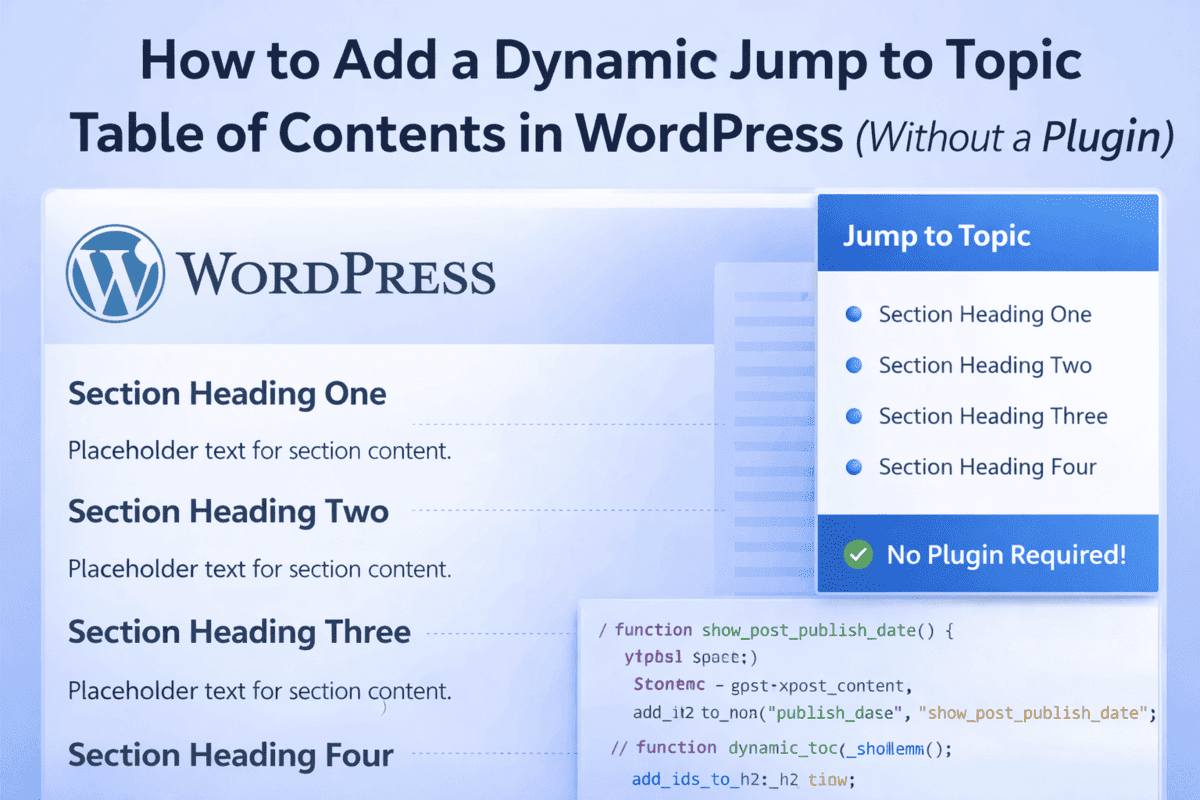
This guide shows how to add side jump links in WordPress using H2 headings. It explains a simple and clean method to create a Jump to Topic section without using any plugin.
You will learn how to automatically collect all H2 headings from your content and turn them into clickable jump links. These links help users move to any section of the page with one click.
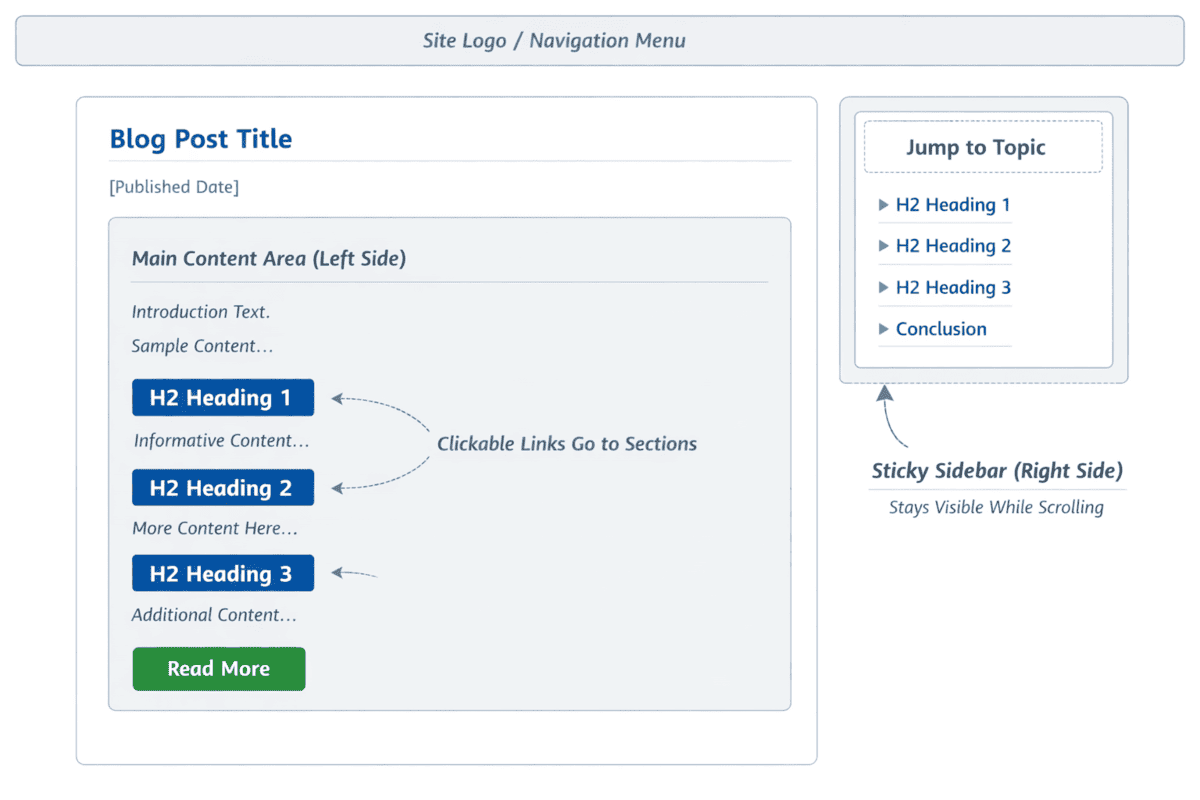
The page layout stays simple and clear. The top area shows the default page header. The main content appears on the left side. A sticky Jump to Topic sidebar appears on the right side and stays visible while users scroll the page.
What We Will Build
Here is list what will be covered next and how each feature will be implemented step by step using WordPress functions.
- A published date shortcode that displays the post date automatically
- A dynamic Jump to Topic section generated from H2 headings
- Automatic ID creation for all H2 headings in the content
- Clickable jump links that work inside the content or in a sticky sidebar
1. Add a Published Date Inside a Page Without Writing PHP Code
This shortcode is helpful when you manage content from the WordPress admin editor and cannot add PHP code inside pages or posts.
You can simply place the shortcode in the content editor, and it will display the published date automatically.
Shortcode: [publish_date]
How It Works
- Retrieves the post’s published date
- Formats it as “January 15, 2026”
- Makes it reusable via a shortcode
PHP Code
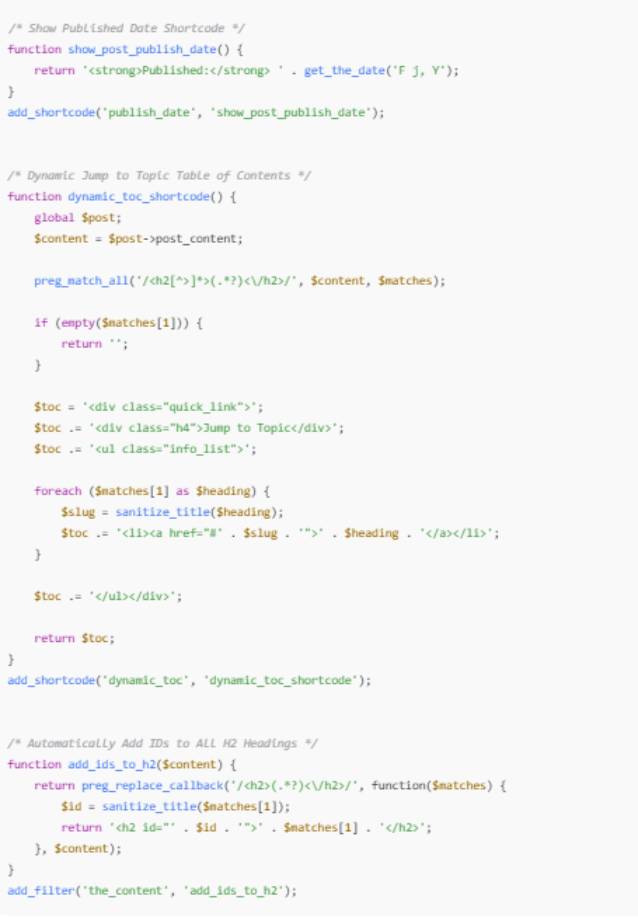
function show_post_publish_date() {

return 'Published: ' . get_the_date('F j, Y');

}

add_shortcode('publish_date', 'show_post_publish_date');
Copy the code and paste it into your theme’s functions.php file. After adding the code, the shortcode works across your website.
This makes it easy to control the publish date from the admin panel without touching code again.
Best placement:
- Below the post title
- At the top of articles heading
- Inside a content meta section
2. Create a Dynamic “Jump to Topic” Table of Contents
This function creates an HTML list using ul, li, and a tags where you place the [dynamic_toc] shortcode. It automatically pulls all H2 headings from your page and converts them into clickable jump links.
You do not need to add links manually. When you add, remove, or change an H2 heading, the Jump to Topic list updates automatically.
After adding the function to your theme’s functions.php file, you can insert the Jump to Topic section anywhere on a page using the shortcode. This setup works well for long blog posts, tutorials, and service pages.
The function scans the post content and builds the Table of Contents dynamically using all H2 headings.
PHP Code
function dynamic_toc_shortcode() {
    global $post;
    $content = $post->post_content;
    preg_match_all('/<h2[^>]*>(.*?)<\/h2>/', $content, $matches);

    if (empty($matches[1])) return '';

    $toc = '<div class="quick_link"><div class="h4">Jump to topic</div><ul class="info_list">';

    foreach ($matches[1] as $heading) {
        $slug = sanitize_title($heading);
        $toc .= '<li><a href="#' . $slug . '">' . $heading . '</a></li>';
    }

    $toc .= '</ul></div>';
    return $toc;
}

add_shortcode('dynamic_toc', 'dynamic_toc_shortcode');
Shortcode
[dynamic_toc]
The screenshot below shows the HTML layout used for the side jump link structure.
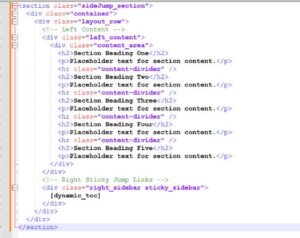
Here clear html copy paste
<section class="sideJump_section"> <div class="container"> <div class="layout_row"> <!-- Left Content --> <div class="left_content"> <div class="content_area"> <h2>Section Heading One</h2> <p>Placeholder text for section content.</p> <hr class="content-divider" /> <h2>Section Heading Two</h2> <p>Placeholder text for section content.</p> <hr class="content-divider" /> <h2>Section Heading Three</h2> <p>Placeholder text for section content.</p> <hr class="content-divider" /> <h2>Section Heading Four</h2> <p>Placeholder text for section content.</p> <hr class="content-divider" /> <h2>Section Heading Five</h2> <p>Placeholder text for section content.</p> </div> </div> <!-- Right Sticky Jump Links --> <div class="right_sidebar sticky_sidebar"> [dynamic_toc] </div> </div> </div> </section>
3. Automatically Add IDs to All H2 Headings
This code automatically adds an ID to every H2 heading in your content. The ID is created from the heading text, so it stays clean and readable.
PHP Code
function add_ids_to_h2($content) { return preg_replace_callback('/<h2>(.*?)<\/h2>/', function($matches) { $id = sanitize_title($matches[1]); return '<h2 id="' . $id . '">' . $matches[1] . '</h2>'; }, $content); } add_filter('the_content', 'add_ids_to_h2');
Once the code is added to the functions.php file, you do not need to add IDs manually. Every new H2 heading will receive an ID automatically. These IDs allow jump links and the Jump to Topic section to work correctly across your pages.
What This Code Does
- Reads the post content
- Finds every <h2> heading
- Converts each heading into an anchor link
- Outputs a structured TOC list
- Displays only when H2 headings exist
Now Here Is the Full Code Structure for functions.php
The screenshot below shows all the required functions added in one place.
Before You Save, Check This List
- All code is pasted inside the
functions.phpfile - No brackets or lines are missing
- The code is added only once
- The file is saved successfully
- The page is refreshed after saving
Final Note
Once everything is set up, you can manage headings, jump links, and publish dates directly from the WordPress editor. This keeps your pages clean, easy to navigate, and simple to maintain without extra plugins.